Project Chronicle
Author: john,
The oil change is easy at this point, nothing to really say here. The transmission service, while not specifically easy, is time-consuming and requires you to run the car and then top it up. It seems like the BMW-authorized procedure has been bastardized by the numerous YouTubers that have done this before, so I cannot provide a 100% accurate method for making this happen. What we did was drain the old fluid, remove the pan, replace the pan, fill it up until it's running out, run the car on the lift until the transmission is up to temperature, and then re-fill. No kidding, and not just the placebo effect, the car shifts way more smoothly than it did before.
There was no metal within the pan, and the fluid, while a bit stinky, wasn't even really that dark.
We also took the time to decontaminate the underside of the motor. What a mess these things make of themselves when the valve cover leaks over time (our first repair to the top of the motor, but this is the first underneath cleanup). This will allow us to watch for new leaks, etc...
Here's to another 137k.
Author: john,
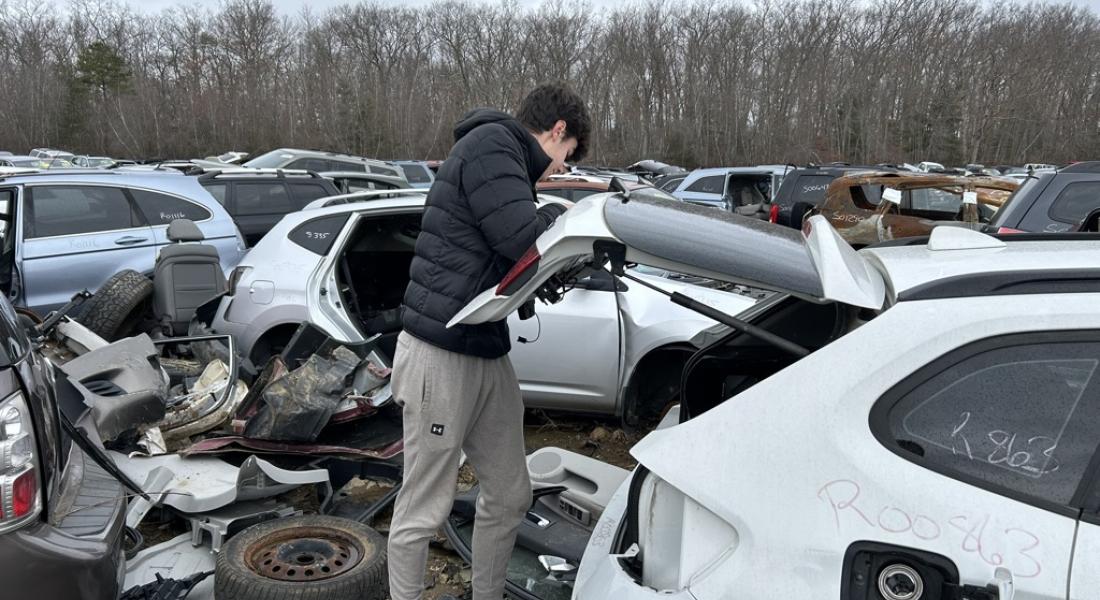
I'll keep this one short as this is unplanned project work... A little boo boo has pushed in the fender. Luckily, a white 2014 X1 was at a local pick-n-pull, and it donated it's no-dings fender to our cause.
Somehow I didn't get any pics of the fender install, but suffice it to say the fender has been installed and you wouldn't know that it was swapped out. The color is exactly the same, and even the texture of the paint looks the same. I guess good job BMW with your paint?
Author: john,
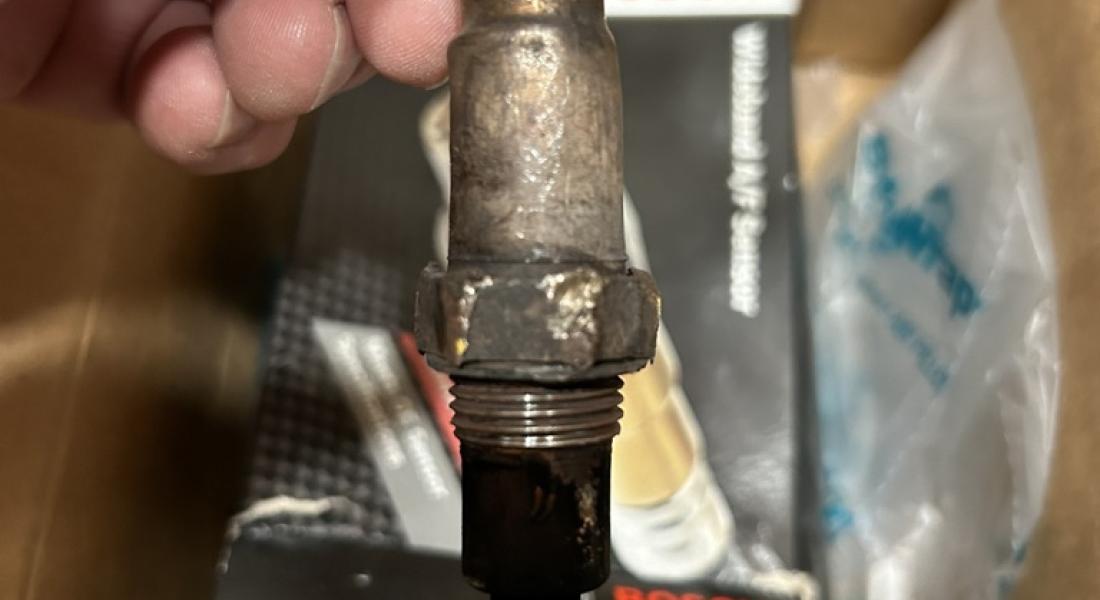
Not sure if someone who wasn't familiar with this device would think it was a piece of coal with a partially rounded-off bolt threaded into it-- If they did that would be a good guess.
I know O2 sensors can be a pain in the ass to remove; the upstream was about a 5 out of 10, but this downstream-- I'm going full 8 out of 10, with 9 being failure with recovery, and 10 being failure and you just throw stuff and go home... Once again, there have been struggles and this was another one. We just snuck this out before it was rounded off; I really thought we were gonna fail on this one. MAPP gas, hammer taps, and it finally broke loose. Had to go slow to make sure we didn't pull the threads out, but it came out. Extra suckage was around the wiring up behind the head, as you have to take the plastics off of the top of the enging compartment out, again... Once again, the positive is that we're getting really good at pulling that stuff off, but it's still a pain each time you have to do it.
Author: john,

Not a lot to say other than this project is actually on the road. Need to get a few weeks worth of shakedown miles so that we can figure out what are best next steps. Observation #1 - The suspension is shot. This was not unexpected, but it's pretty bad. However, everyone's pretty psyched we got this far this fast, so, still focusing on the upside...
Author: john,
I'm going to keep asking myself how this happens, but I already know the answer - BMW shop rates, that's how. Original shocks obviously, so dead that they don't do anything other than let you pull the piston in or out with ease. Every corner of this thing was springs-only, unbelievable if someone was actually driving this thing.
Replaced with the obligatory Bilstein B4 OE replacement.
More tips, as there's zero information on working on an E84 X1 available. Anything I can do so that someone else doens't have to endure the agony that we did has to give me positive karma...
- You cannot get the front struts out / in with the lower tie rod end attached! You have to remove the tie rod end from the spindle, which will allow the front suspension to fully extend, and then the strut will come out. You will need a tie rod end remover / spreader cuz this guy is really in there, and an impact gun is a nice-to-have. Don't even attempt without the correct tools. Rent them if you need to.
- On an old rusty install, the end of the strut won't want to come out. Once the lower strut jam bolt is removed, you have to spread the housing apart. Some people say they use a 3/8" to 1/4" adapter and turn it, but I didn't want to put that much initial pressure on it. A tapered steel punch works fine. Spreading it sufficiently will alleviate the need to beat on it with a sledgehammer.
- ON AN XDRIVE THE HALFSHAFT WILL FALL OUT OF THE TRANSFER CASE WHEN THE SUSPENSION DROPS. WHATEVER YOU DO, DON'T SPIN THE HALFSHAFT. BE NICE TO IT, AND JUST PUT IT BACK IN PLACE. You'll feel if it's not going in, and can see the inner boot twisted if it's been moved. DO NOT pound on this to get the shaft back in.
- Assembly is fairly straight-forward once it's apart; just mind the halfshaft.
Now the ride is great; not super-stiff, but what I would expect. On to the next issue!
Author: john,
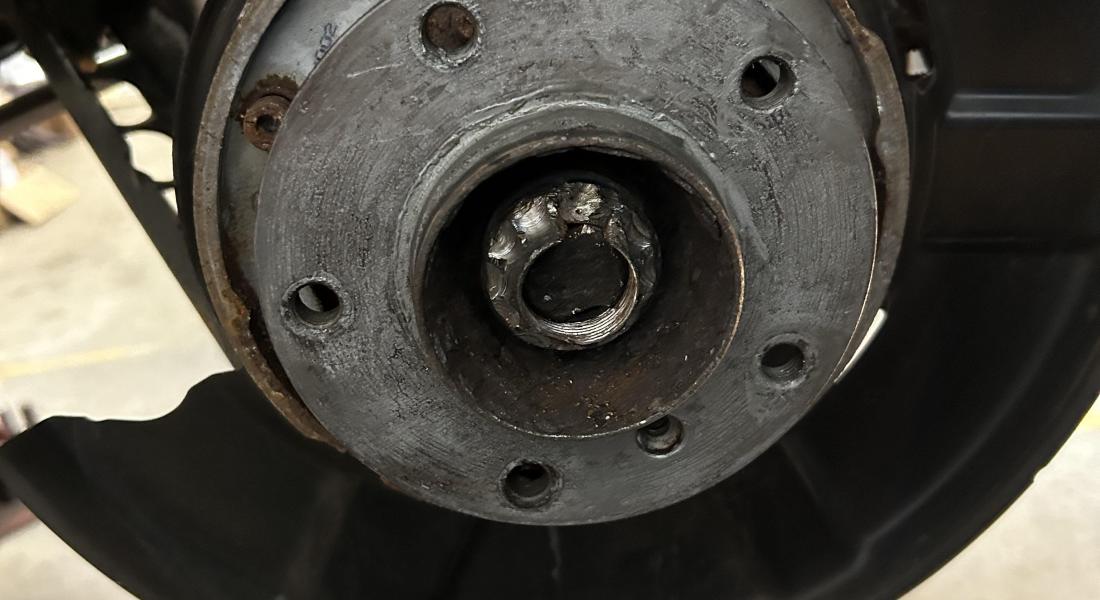
Rear wheel bearing on a 10 year old car with a bit of corrosion. Maybe my biggest DIY challenge so far-- This job is no joke. We had access to a lift, air tools, impact gun, etc., and we needed all of those things in addition to fire, patience, penetrating oil, and ingenuity.
In the pic, you can see a nice shiny axle nut. When new, this thing is torqued to 150 ft. lbs. So getting it off a week after it was built was already going to require breaker bars and leverage. This nut was rusted so heavily that it was basically round, and it's only shiny here because it's been cut down by a die grinder, which was a fabrication move to make this 32mm nut into a 30mm nut so that we had 12 points to grab onto. We finally got the nut off, but 10 years of rusting together plus factory press-fitting of the hub made hub removal nightmare #2. Enter slide hammer, which was an emergency measure auto parts store tool rental (thanks AutoZone!) on 12/23 @ 7 PM. 15 mins of slide hammering and the hub is off. Now the actual bearing which is secured with four internal to the trailing arm bolts that are not only rusty, but hidden behind the axle, shock and trailing arm. Doesn't matter if they break or not, but they're large bolts so breaking them will be a challenge, so lots of extensions, some heat, finally bolts are out. Bearing removal - Once again, slide hammer with a wheel hub puller, and the bearing is out.
Next challenge - Built a press to install the new bearing on the old hub. Parts houses say use a new hub, but seems like it's going to require the same work to reuse the old hub. OK so the press is probably the easiest part of this job; straight-forward process but still sketchy as the bearing is a tough push. Patience and the bearing is seated and hub is ready to go. Finally some forward progress.
Time to install the hub back on the half shaft. What nobody tells you, and what's not in any of the how-to videos that are out there (and you don't know until you try to assemble the hub back onto the half shaft) is that the splines of half shaft don't really go into the hub without some sort of miracle. Seems like the hub may have been hot and the axle cryogenically frozen when originally built to ensure a tight fit. The general idea is to try to get enough threads on the half shaft exposed so that you can thread the new hub nut on (nut is now 36mm), and then slowly pull the shaft through the hub via tightening the nut. You can't do this unless you catch several threads with the nut, and getting the shaft this far exposed is almost impossible. I'm like, WTF, I've never seen this; if you search "E92 can't get axle in the hub", you'll see various horror stories on how bad this job is. It's that bad. Several hours later, careful heat on the hub, hammering the axle flange from the rear with a 3/8" extension while turning 90 degrees to coax it through just enough, by some miracle the axle exposes enough threads to carefully start to draw the axle through the hub with the nut. Victory is close.
Reassembly of the parking brake (the mechanism of which is another clever puzzle dreamed up by BMW's crack engineering team) complete, reassemble rear caliper carrier, put the brake back together, and it's done.
Author: john,
Initial reassembly complete. Not much to say other than we were able to sort a bunch of stuff out, replace a bunch of broken plastics, size up what we need to do to re-mount the radiator (coat hanger support still hanging tough...), and will start to work towards the mechanical repairs list.
Look at how happy Boy Genius is...!
Author: john,
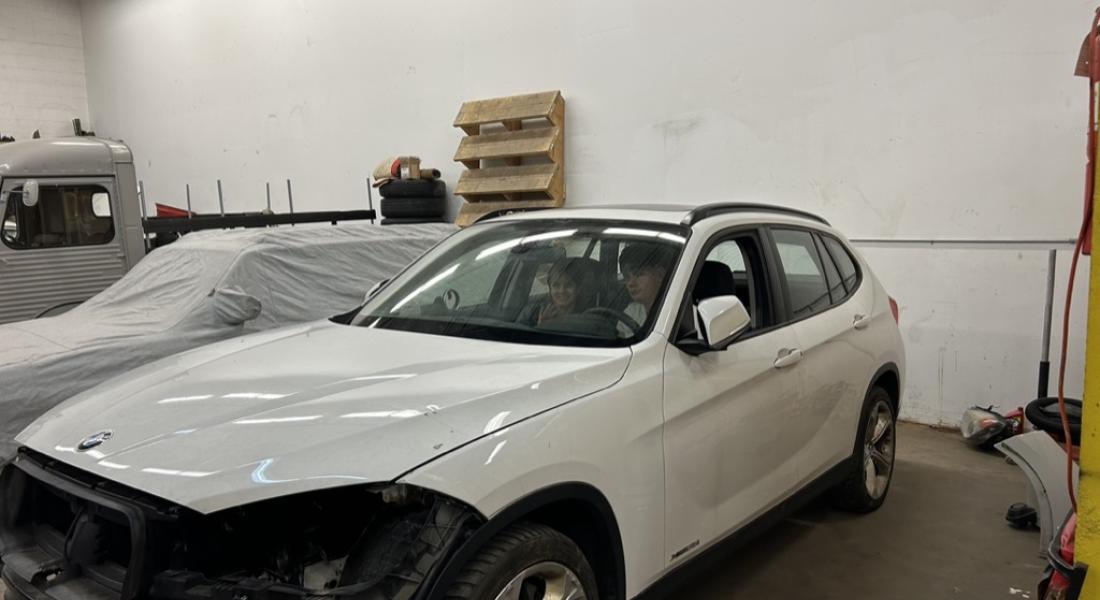
Going forward and focusing on the positive-- The inside stakeholders on this project are in love with this thing. My first car was a 1980 Monte Carlo that was two-tone Dark Claret metallic and Claret Metallic red. The Dark Claret had turned into baked horseshit with no more metallic, and it smelled musty because the passenger side rear footwell always filled up with water when it rained. So this is a major step up for Boy and Girl Genius.
Back to the car-- The non-geniuses that owned this previously must have decided that the undertray that lives under the engine was a nuisance item, and decided to not bother reinstalling it. This person also had the parking sensor that was missing up front (torn out during the stunt show...?).
We also noticed that the all of the cowl plastics were not even installed when we first looked at it in the junk lot, which we thought was a positive because anyone else looking at it would think it's all broken (which it wasn't, but made things look really bad). So we're starting to think that someone started to work on this and just cut their losses, which seems plausible. So, used undertray and parking sensor from eBay, and have extra bolts from the E46, so will keep mending all of these things as we find them.
Author: john,
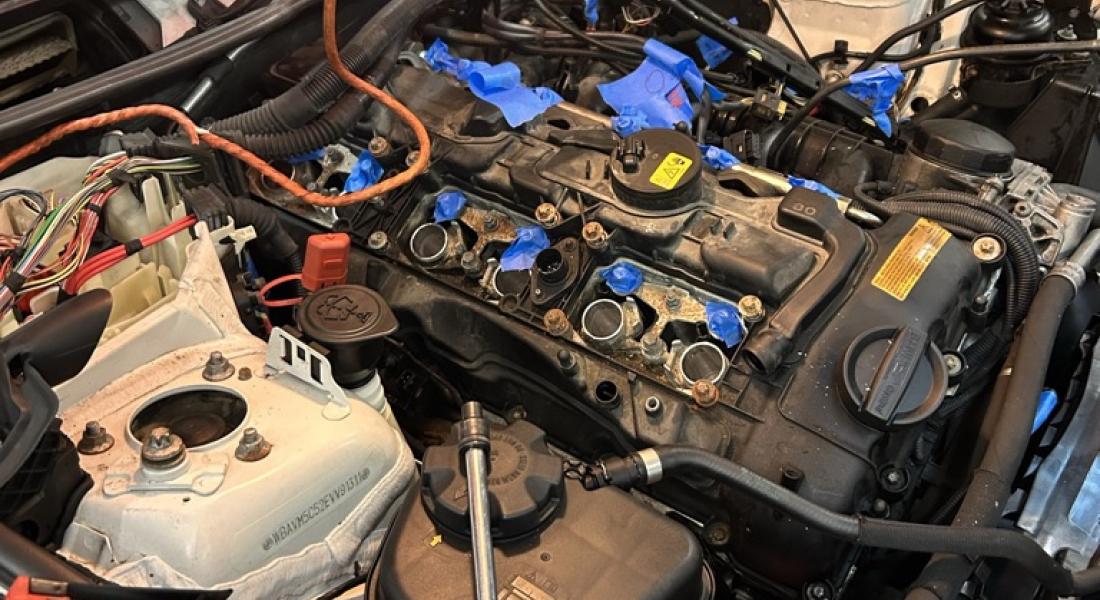
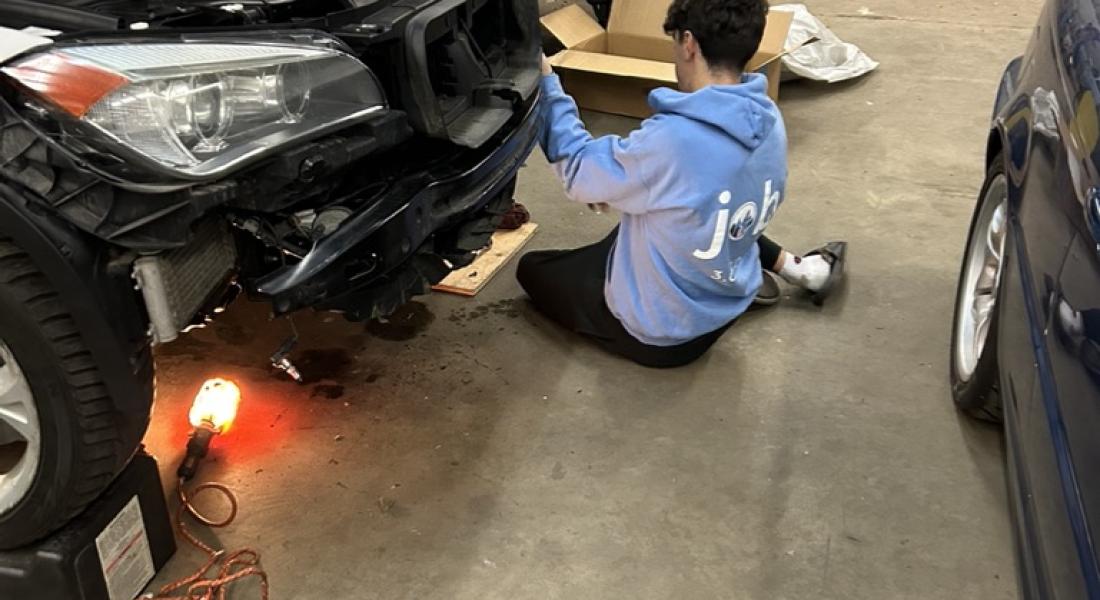
Initial upper engine disassembly and seeing what we have to deal with is starting. First observations - Leaks oil heavily. BMWs are notorious for valve cover gasket leaks, and this thing looks like it's a candidate for the leaking gold medal. This was a known, but man, this thing has to have been leaking for years. Next challenge-- One of the plugs was like "I'm not coming out, no way..." This was the scariest moment, because something dumb like a spark plug either pulling out the threads of the head, or breaking off in the head, would pretty much wreck this project before it even gets going. Patience and good learning for Boy Genius as well as myself-- Whatever you do don't break something off in the head.
Next observations - No doubt thing thing had an off-road excursion that didn't go all that well. Off comes the front end, and initial review shows that the radiator is no longer on mounts, and parts of the core support are broken. The intercooler is holding in the radiator, and the intercooler is held in by coat hangers that were twisted together to form supports. Yep. The fan shroud is totally broken at the bottom but somehow the fan still runs and somehow the radiator is not damaged. However, the radiator is off kilter, and my OCD is flaring up almost in an uncontrollable fashion. This would explain the upper radiator hose weeping, and now I can tell it's because the radiator isn't where it should be.
The plan will be to get the oil leaks stopped, get new plugs in it, change the oil, fix up the broken radiator mounts, fan shroud, and whatever else we find in there, and run it just a bit to get some sort of baseline as to how bad the rest of it is while we get more parts ordered.
Author: john,
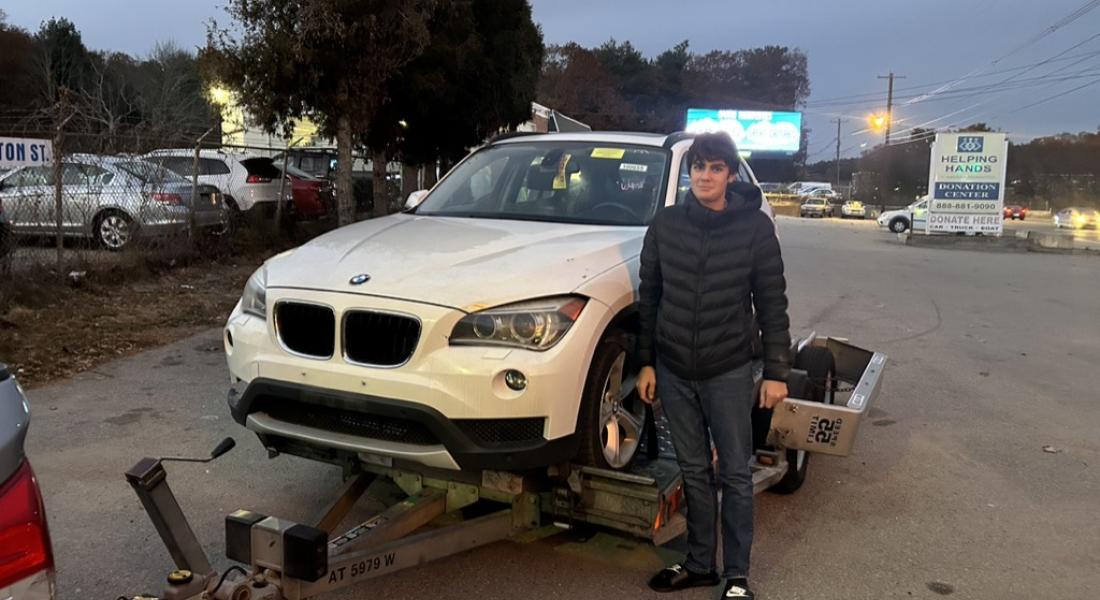
OK so kicking off this project; hoping it's going to be a fun one, and also hoping it doesn't cause too much pain. The ingredients are as follows - BMW with a clean CarFax but zero maintenance history; appears that it fell into the ownership of someone who decided not to maintain it at all; appears to have had some sort of off-road adventure that negatively modified some front end plastics and broke the radiator support. Who knows what else we'll find, but one positive is the small wagon layout is allowing us to fill it up with an initial load of parts we know we'll need. Commence project...